I’m My Own DIY Hero (With Help From the Internet)

Despite our house being a fairly new house, we’ve had some issues with our furnace for the past few years. The problems have always been intermittent, but happen at the worst possible times. As in, the colder it is outside, the less likely it would be that the furnace would turn on.

During last year’s polar vortex, I nearly broke down and called in an HVAC specialist to fix our furnace when we woke up one morning to a 55 degree house. But that same morning the furnace then came on and warmed us back up to a comfortable 70 degrees, so I let it go. If I didn’t have to spend a fortune on a repair, I wasn’t going to. (Yes, I’m cheap.)

Part of the reason I refused to call someone in is that, unlike the furnace, our gas fireplace has worked reliably. So even on days when the furnace wouldn’t come on more than once a day, the gas fireplace could keep the living room tolerably warm on its own during the day. Honestly, during the winter our gas fireplace is on for the entire day most days. We’ve found that it actually saves us money to keep it on. If the fireplace could get us through the most temperamental days of the furnace, we’d be fine.

This year, though, the furnace had been ignoring the thermostat more than usual. I knew it wasn’t the thermostat causing the problem – we had that replaced just four years ago, and in those cases the furnace wasn’t even trying to activate. In this case, the furnace would give it a try, the burners would ignite, and then it would shut off a couple of seconds later. This would happen 3-4 times in a row, and then the furnace would give up and stop trying.

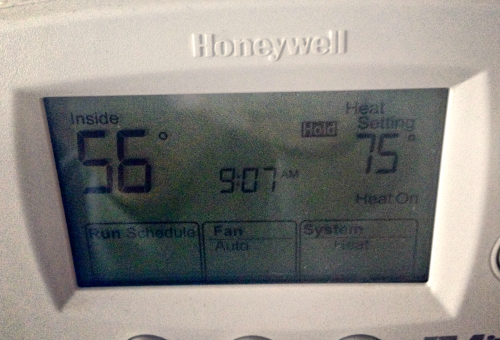
Cold insideWe have a problem here.

So I recently found myself in the position of needing to call someone for a repair, or figure it out on my own. Google to the rescue!

After some searching, the leading theory was that the flame sensor was dirty and needed cleaned or replaced. The flame sensor detects if the burners actually ignite. If the sensor can’t tell if the burners ignited, it’ll shut everything down instead of risking gas flowing freely without a controlled flame burning it.

That explained all of the symptoms, but how in the world could I clean the sensor? I read a few guides, but they just weren’t thorough enough for me to feel comfortable with what I was doing. So I turned to my next DIY helper: YouTube.

I can’t begin to say how thankful I am for the folks who post YouTube videos of how to fix stuff around the house. They saved us when we needed to replace a leaky part of our kitchen sink a few years ago, they helped us learn how to snake our our toilet when a certain little kid used too much toilet paper, and they have now helped me repair my furnace. After watching two videos about the process, I felt comfortable giving it a try. (With Aaron as my backup.)

So, if you’re ever wondering how to clean the flame sensor so your furnace will turn on and stay on, let me show you how to do it:

Step 1: Turn off the electricity to the furnace. Important step here when you’re inserting metal screwdrivers deep into your furnace.

Step 2: Remove the cover of your furnace and find the burners.

Step 3: Locate the flame sensor. It’s usually a thin metal rod sticking up in front of one of the burners.

Find the flame sensor

Step 4: Figure out where the sensor is attached. It usually has a screw holding it in, requiring a screwdriver. Or, in our case, an itty-bitty socket wrench. Ours was attached above the burners, but yours might be attached underneath.
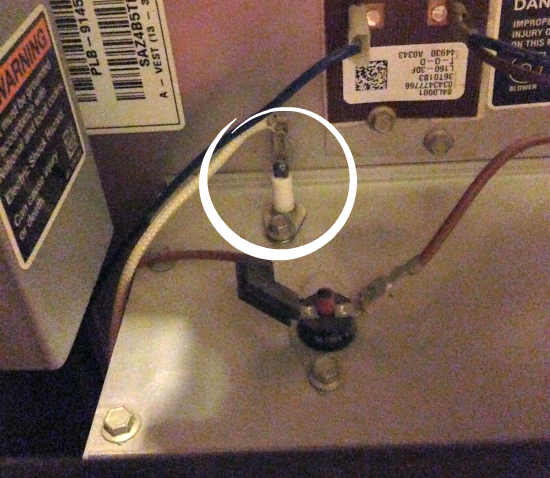
flame sensor attachmentI circled ours – it attached from above the burners.

Step 5: Carefully remove the flame sensor after loosening the screw holding it. Don’t touch the metal part – the oils on your hands can damage it! See all that black and white stuff on the sensor? That soot is what was keeping it from sensing the flame properly.
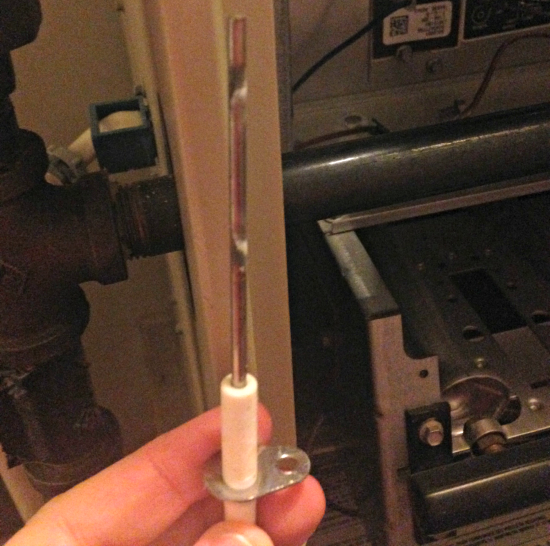
dirty flame sensorIt doesn’t seem like much, but it’s enough to keep the furnace from working.

Step 6: Gently clean the sensor. Videos and written guides recommended a very, very fine grain sandpaper, soft steel wool, paper, or anything that isn’t too rough. The best suggestion I saw was using a dollar bill – it’s just abrasive enough to clean the sensor without damaging it. I used a crisp bill to clean ours. You won’t be able to get all of the black scorch marks off of it, and that’s okay. You’re only concerned with getting any loose debris off of it.
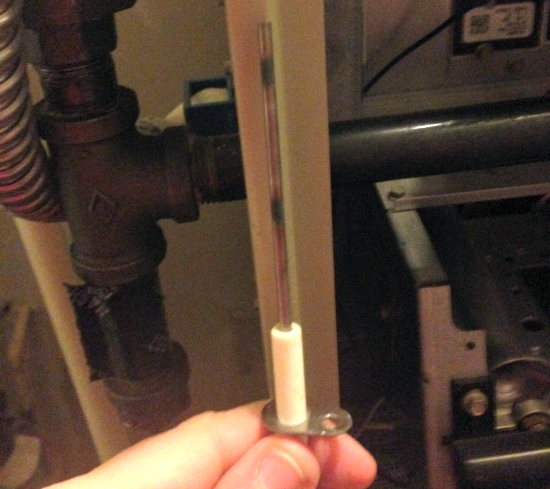
clean flame sensorIt’s cleaner, even if it doesn’t look that different.

Step 7: Carefully put the flame sensor back in place and secure it with the screw. Basically, reverse everything you did to get it out.

Step 8: Flip the switch at the circuit breaker box to power on the furnace again. Leave the cover off (if your furnace allows it) so you can check if everything is working. If all goes well, the gas will begin to flow, the burners will ignite, and they’ll stay on this time. If it’s all working well, replace the cover, pat yourself on the back, and go enjoy a warm house.

working furnaceA very happy sight.

If it doesn’t work, you might need to replace the sensor. I’m told this is a cheap part that you can find at any hardware store, and is nearly as easy to replace. In our case, cleaning it worked just fine.

Since cleaning it, we haven’t had any issues at all with the furnace. I’m still not very handy, but thanks to the internet I can do a great job at faking it some of the time!


A Tree Dilemma

I had mentioned that we bought a new Christmas tree last week. This tree was just what I wanted: 7.5 ft, pre-lit artificial tree with LED lights. Even better, this tree has a little box on the cord that lets you switch the lights on the tree from white lights to multicolor lights. I generally prefer white lights, but I thought it would be fun to let the kids get to see it with multicolor lights now and then.

On Friday afternoon, we set up the tree in the living room. Aaron plugged it in and we verified that the lights worked. The multicolor lights were disco-party colorful and the white lights were a bright, yet warm, white light. The kids asked to put it on the multicolor lights while we decorated the tree, so we switched it over to the colorful confetti of lights.

The next day, our tree fully decorated, I stood back and admired the total look. It was still set on multicolor lights, so I reached down to the controller and flipped it over to white lights.

But this time, the white lights weren’t so bright. In fact, they were very dim, barely lit at all.

I thought I might have wiggled the plug loose, so I reached back to the plug and verified it was fully plugged in. The lights were still dim. I turned the switch on the box back to multicolor, and suddenly they were blindingly bright again.

What?? I tried switching it back and forth a few more times, but the white lights remained dim, while the multicolor option worked perfectly. When we first set it up, the white lights worked without any trouble – why are they now not working?

So now, we have a dilemma: what do we do with this brand new tree? Do we continue trying to make the white lights work again? I still have the receipt – do we take all of the decorations off, take down the tree, box it up and return it to the store, only to get a new one and go through decorating it all over again?

Or do I just put my love of white lights behind me and learn to embrace the rainbow?

Christmas tree, 2013Cosmo would prefer we leave it, as he was slightly traumatized by bringing this giant thing into the house.


My To-Do List Needs Some Weeding

It just occurred to me that August is nearly over, which means summer is nearly over. And I’m now baffled as to where the time went?

I’ve been told the years fly by faster as we get older, and I’m convinced that the only reason this is said is because we pile on more responsibilities every year so we’re too busy to even remember to place the X’s for each completed day on the calendar.

Time didn’t fly as a kid. When I was eight years old, summer lasted for what seemed like forever. But at eight years old, my only summer responsibilities were picking up any toys I brought out of the house and being back home before dark. Hardly a packed schedule.

Now I have so much to do that things always get neglected due to running out of time to get to them. It’s vital to mentally sort what needs to get done from what I’d like to get accomplished and make sure the needs are finished before moving on to any “what I’d like to do” items.

And sometimes? Even the needs have to be sorted into extremely important and not-so-important categories. Hopefully you know what I mean – those days when you have to say “Do I NEED to do laundry today, or can these jeans go one more day?”

For example, at the beginning of the summer, I was excited to get outside and make this the year our yard looked nicer. We trimmed the edges of the lawn, I planted flowers around the base of the tree (which are still mostly alive despite my negligence), and I dutifully weeded around the house and the patio. There were plans to do even more, too.

But it didn’t happen. Other needs got in the way. Aaron has continued to mow all of the lawn regularly, since that’s one of those extremely important issues the HOA would crack down on. (Also, we don’t want ticks.) The front yard has even had the edges trimmed a few times, too.

But the backyard? Total disaster. My first weeding experience was intense, and I used a weed spray to make sure they wouldn’t come back. Weeds, however, are the genetic supermutants of this century, proving the theory of evolution as they laughed at my weed spray and grew back faster and with more vitality.

So fast, in fact, that some are trying to overtake my youngest child.

The weeds are too tall.Yeah, I’m just as surprised as you, Mira.

For reference, she’s four feet tall.

So yeah, the back yard is slightly overgrown. Or very overgrown, if you regularly keep a manicured lawn. In my defense, I had a lot of other stuff going on this summer, and didn’t notice that two months had gone by without weeding. And at this point I don’t know how much weeding I’ll get done going forward, other than the patio, cause we do use it more in the Fall. I may let the ultimate weed-killer – aka: Winter – take care of the rest of them and vow to start fresh in the Spring.

I have the best intentions with my to-do lists. But I overestimate what I can get done in a certain amount of time, then have to cut the list down to only the items that will cause problems if they’re not finished. Work gets done, food is purchased and prepared, bills are paid, the family and our clothing are kept clean, the house is kept sanitary (but cluttered), appointments are (mostly) kept, but everything else? It may or may not happen.

Someday I will be more organized, but that day is not today. The rest of this week is likely booked as well.

If anyone thinks they’re more organized and on top of their to-do list than me, please feel free to share your secrets to getting it all done in the comments. Cause my only solution at the moment would involve adding more hours to the day, and I’m not sure everyone else would be cool with slowing down the Earth’s rotation a little for that purpose, even if it did have the side effect of making us weigh less, too.


Green-like Thumb

When we bought our house, I was so excited about having our own yard. There were fantastic ideas in my head of beautiful landscaping and a garden in the backyard full of fresh herbs and veggies and a lush, green lawn for our children to play and walk barefoot on.

I don’t know who I thought would take care of all of these things – perhaps I thought we’d be wealthy enough to afford a landscaper? Because certainly I wasn’t going to be the one to nurture all of these plants.

My mom is the green-thumb in the family. She can keep nearly anything alive, even if it’s on the brink of withering away. I, on the other hand, am usually the one who can get a plant to the nearly-withered-away state. My ability to kill plants is nearly a superpower – if I were an evil villain, I’d probably be called the Wilter.

It’s not intentional, though. I try to do my best with our yard. I had a garden for a few years, and even managed to produce some broccoli from that garden. Cosmo has reduced my ability to have a garden now, thanks to his evil sidekick taste for young plants, but I did do some container gardening last year that was a semi-success. And (with help) we planted our little arborvitae evergreen trees out back last year, which have so far survived my care.

With my new mission to make this house a little more home-like, I’ve had to take a tough look at the outside as well. I don’t want to be that house in our neighborhood. (To be honest, it would be really hard to be that house with the number of rentals and foreclosures in our area, but I’m also aiming to not be in the bottom 50% either.) My project this past weekend was the tree in our front yard.

We placed a little ring of landscaping bricks around this tree years ago. Originally there was mulch inside the ring, but over the years it’s all disappeared and the ring has contained a mess of dead leaves and weeds. Our soil is also extremely hard clay soil, making it impossible for things to grow well, and that’s resulted in our tree’s roots staying close to the surface as well.

The first thing I did was scoop out all of the leaves into a yard waste bag, along with pulling most of the weeds within the ring. Some of those weeds were stronger than expected and tried to pull back. Then I carefully adjusted the woefully uneven bricks, trying to make them lie even again. I wasn’t able to get them to lie perfectly even because the tree roots have pushed some areas up, but most of the ring looks pretty good now.

No weeds or dead leaves, but not pretty.Tree roots made the back part of the ring bumpier than I’d prefer.

Next, it was time to fill in that ring. I emptied three bags of topsoil, combined with half a bag of peat moss, inside the ring around the tree and mixed it all up. At the very least, I hope covering the tree’s roots will help protect our red maple from the fate of so many other trees in the neighborhood. (Tree death is high when you live in a new subdivision that stripped all the topsoil off to sell before building houses on clay.)

Mira went with me on Saturday to pick out flowers to plant in the ring. A five year old doesn’t necessarily know the best flowers to pick, so I enlisted the help of a store associate. After describing to her my lack of skill with anything green, and my requirement that anything we buy needs to be easy to care for, able to handle some neglect, and preferably could handle itself like a weed, she pointed me to the right flowers. She didn’t even laugh at me, though, which I appreciated.

This was the final result:

Look! Pretty flowers now!Not a bad transformation compared to the naked tree above, right?

The light purple flowers are creeping phlox, and the bright pink ones (Mira’s choice, no surprise) are dianthus. And yes, I still had to look at the little cards that came with them to remember what they were and how to spell them.

There was nothing complicated to planting the flowers – I dug a hole with my hands, took the flower out of it’s plastic pot, and plopped it in the hole, filling the area back in with dirt. I’m not sure if I spread them out well enough, so we’ll see how they grow. I finished this project by covering everything with a good layer of mulch and a silent wish that they don’t die.

Can I keep them alive now?No really, please don’t die, little flowers. You cost too much.

And just like that, our front yard has a little bit of color now, hinting that someone actually lives in this house and cares about it’s appearance. The next step, of course, will be keeping these little plants from wilting away. Who knows – maybe if I can keep this little contained flower bed alive, I’ll add more flowers to other parts of the yard?


Spring Cleaning: Time To Let In The Fresh Air!

It’s Spring Break for us, but the weather has yet to act like Spring yet. I was hoping that with the break from school being so late this year, we might have warmer weather to give the kids more time outside. The days have been sunny, but they’re still wearing their winter coats to go out.

Now that the week is nearly over, I hear our weather is supposed to warm up to real Spring temperatures. If it holds through the weekend, I might get the chance to throw open the windows to let the first fresh air of 2013 into our house.

Our house has been stuffy for the past few months. With a dog, cats, four humans and carpeting, it’s easy for the air in our house to seem stale and dusty. I’ve given up on dusting for the moment, honestly. The last time I dusted (using a product that traps dust), everything had a new, light coat of dust on it within two days.

 Exhibit A: Two of our dust creators.

Of course, I can’t ignore the dust. We’re an entire family of allergy sufferers – even the dog and one cat have allergies! It’s just exhausting to try to keep up with making our air better to breathe. Dusting and vacuuming regularly help, but getting all of the dust and allergens out of the air requires a transplant of fresh air.

I love that first day of opening the windows, too. Feeling the cool, fresh air fill the house is exhilarating. Sounds silly, I know, but after having dry, recycled air pushed around the house all Winter, I’m ready for a change of air. I’ll often dust and vacuum that day, too, hoping the fresh air will carry some of the airborne pollutants out a window with it.  This is also the time for us to clean out the furnace filter.

Opening the windows and forcing some new air in here will be a good temporary solution for us, but it only lasts so long. As soon as Summer is here, the windows are often shut to keep out the heat, and in the fall (Aaron’s worst allergy season), our goal is to keep the outside air OUT of the house to keep his ragweed allergies to a minimum.

We used to have an air purifier, and with kids and more pets now, I think it’s time to get another one. They’re not nearly as expensive and huge as they used to be, and they’re a lot more efficient than the ones of 5-10 years ago. They also aren’t as loud as my old one, which sounded like a cross between a fan on high and a jet engine. (Thank goodness.)

Best Buy is having a sale on their air purifiers, with something for everyone, from small rooms to whole-house. I’ve got my eye on this one for the downstairs. It’s small enough to not take up a lot of space, it has a washable filter, and it’s energy efficient. All I hope is that it’ll keep the air a little cleaner and let me dust a little less often.

If you’re also trying to keep the dust and allergens under control, you might want to check out this 20% off coupon they passed along for me to share with all of you. (Note: I’m using the coupon as well!)

Disclosure: The reviewer has been compensated in the form of a Best Buy Gift Card and/or received the product/service at a reduced price or for free.

Related Posts Plugin for WordPress, Blogger...